Build Burning Gundam - HAG Group Build
This kit is meant for HAG Back to Basic Group Build. It focus is on the kit itself, tackling the foundation of scale modelers. The kit were limited to the current anime series Gundam Build Fighter.

Since I had resign from my previous job, I had decided to save some cash and time so Build Burning Gundam was the first choice...
However... somewhere down the road, I went to get Star Build Strike T_T
Which I feel so guilty of because I'm spending even less time to work on my portfolio... haiz...
Back to the model kit, I have to say that this kit is really amazing, the poseability of it is great.
Seam line are minimal with it located between the head, shoulder and forearms.
Not alot of mold line as well, the thigh have the most obvious one.
The details on this kit is minimal but can be brought out nicely with some masking.
There is lots of play-ability for this kit since they have a few effect parts and they react to black light by default.
There are 5 set of hands, 1 of which is the effect parts.
The only issue I face is the inner joint for the shoulder to be attach. I like the design but it being too close to the torso piece which tend to scratch the paint and decal away during my photo shoot.
Basically, this is a kit that I will recommend to beginner who want to learn the introductory stage of this hobby.


That's all folks, be sure to check out it buddy Star Build Strike too. Thanks for viewing.
Since I had resign from my previous job, I had decided to save some cash and time so Build Burning Gundam was the first choice...
However... somewhere down the road, I went to get Star Build Strike T_T
Which I feel so guilty of because I'm spending even less time to work on my portfolio... haiz...
Back to the model kit, I have to say that this kit is really amazing, the poseability of it is great.
Seam line are minimal with it located between the head, shoulder and forearms.
Not alot of mold line as well, the thigh have the most obvious one.
The details on this kit is minimal but can be brought out nicely with some masking.
There is lots of play-ability for this kit since they have a few effect parts and they react to black light by default.
There are 5 set of hands, 1 of which is the effect parts.
The only issue I face is the inner joint for the shoulder to be attach. I like the design but it being too close to the torso piece which tend to scratch the paint and decal away during my photo shoot.
Basically, this is a kit that I will recommend to beginner who want to learn the introductory stage of this hobby.
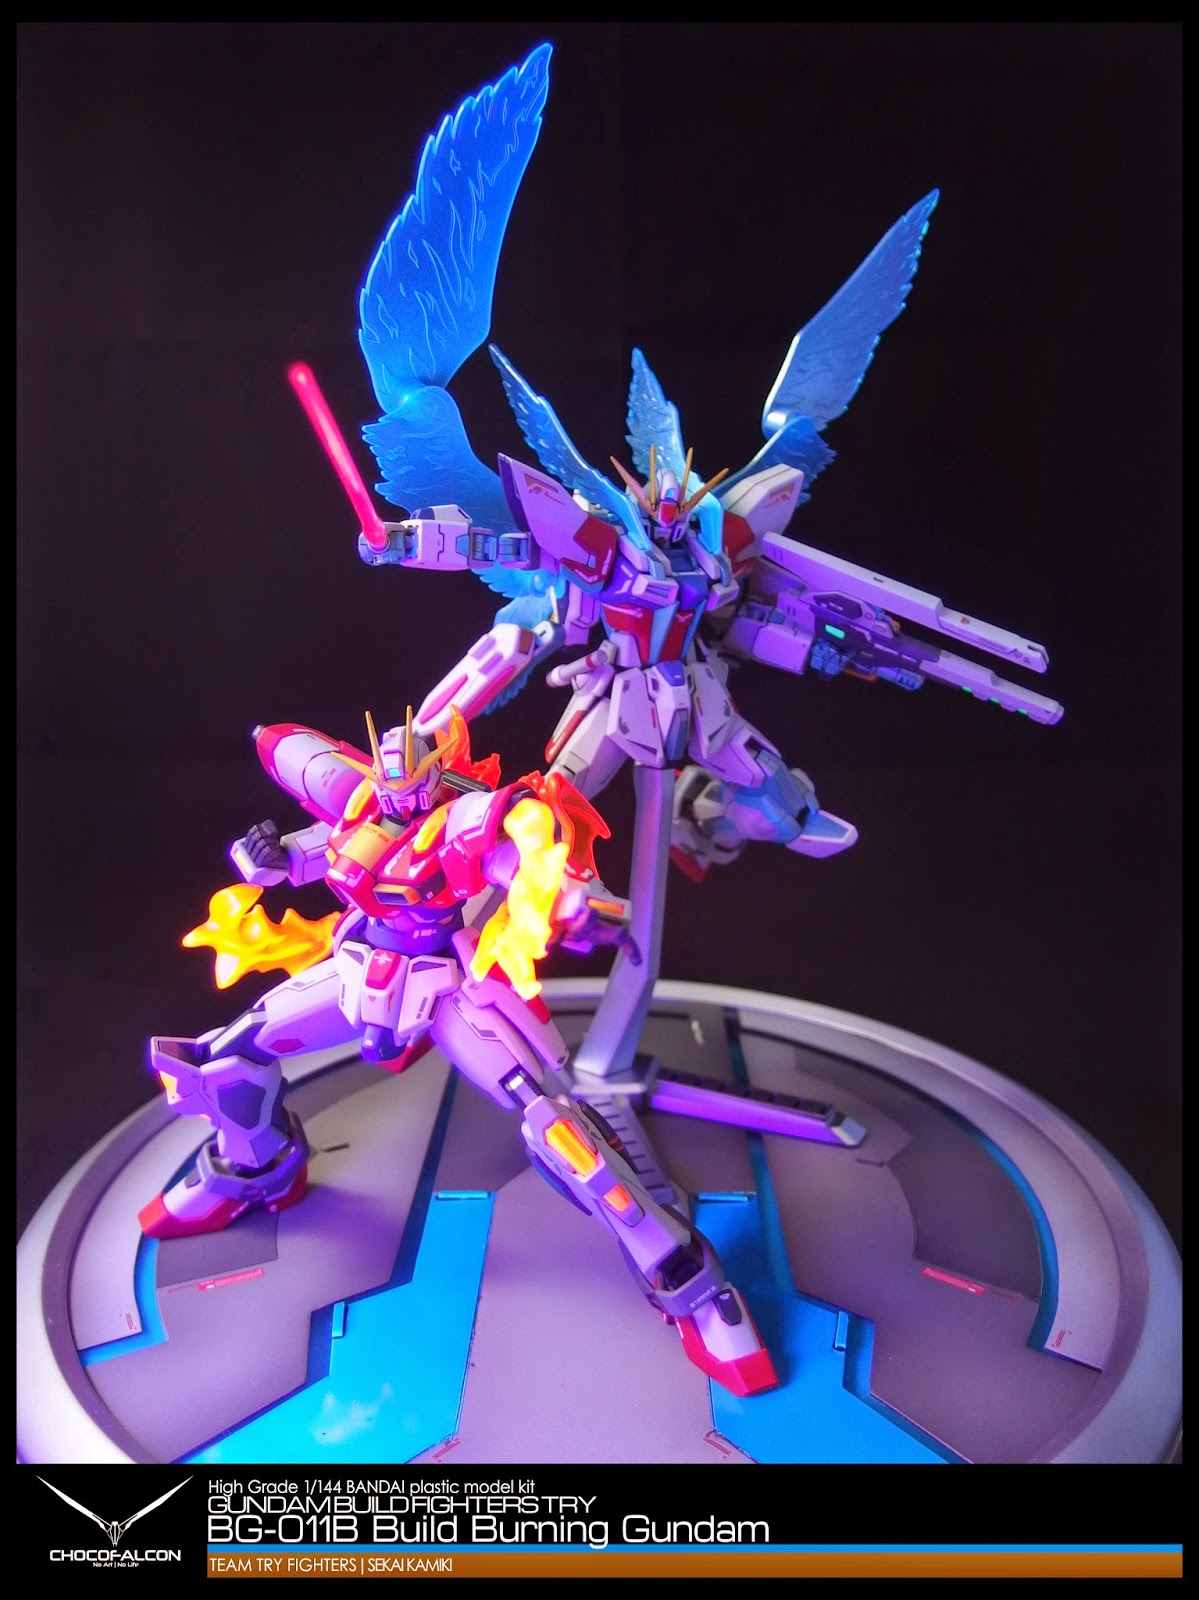
Let's jump in and take a look at my completed Build Burning Gundam.
The flaming effect parts are painted with Gaia fluorescent orange and red.
The blue and orange effect parts on the body is painted with rough silver and coated with Gaia fluorescent blue/orange.
The eyes and camera lens are painted with Gaia silver and top coated with Gaia fluorescent blue.
Primary color on the kits are painted using Gaia colors and a pre mix of enamel grey.

Hi, your work looks cool. May I know the ratio for thinner and fluorescent paint?
ReplyDeleteWhat will happen if I didn't paint with a layer of other paint but directly paint the fluorescent paint on top of those clear part?
Thanks Jeremy, the ratio is am using is 2:1 thinner to paint. I suggest playing around to get the hang out of it cause not all thinning ratio are the same. :)
DeleteAs for clear parts, I don't think there will be any side effect you didn't paint another layer of other paint.
Hi, what decals do you use ?
ReplyDeleteBandai RG Mk 2 Decals
DeleteHow did you paint the flaming parts? It looks so damn realistic!
ReplyDeleteI was using fluorescent paint on those flaming parts.
DeleteHi,how do i make the gaia fluorescent paint work the best? I mean i've tried to paint a clear part directly with the paint unthinned...but it seems it's not working...because after i've exposed it to the light and then i shut off everything...no glowing...where is the mistake?
ReplyDeleteU will need to shine it with UV light in order for it to glow. Gaia paints require thinning.
DeleteHmm it looks like your website ate my first comment (it was super long) so I guess I'll just sum it up what I had written and say, I'm thoroughly enjoying your blog. I as well am an aspiring blog blogger but I'm still new to everything. Do you have any helpful hints for novice blog writers? I'd certainly appreciate it.
ReplyDeleteglow in the dark paint
Hi, sorry for the late reply. I kinda neglected blogging for a few years. I guess, just like any other social media, it all about being true to yourself and what value can you provide to your audience. Thanks for your kind words too. :)
DeleteHello I know this is a very old post but did you mix the fluorescent orange and red or did you paint one over the other? I'm trying to figure out if the gaia florescent colors are able to mix to achieve a purple. Thanks
ReplyDeleteHi, sorry for the late reply. I hope you manage to get the answers before this. As for the approach, I painted red before the orange. But both are spray very lightly so you can't really tell if it red or orange at the end. :)
Delete